Busy weekend
Sunday, November 13, 2005
I accomplished (and learned) a lot this weeekend. First I fitted the neck. It took some sanding on both sides of the neck joint to get the neck to drop in the slot all the way. One very important thing I learned- DO NOT use too much force when fitting the neck. Yes, it is supposed to fit snug, knowing how snug I'm sure will come with experience. I heard a sickening CRACK, but when I looked, there were no visible cracks and I think it was just an early warning that I needed to remove some more wood. Once I got the neck joint to fit, I measured the neck alignment to center. It was off to one side by about 1/4". I was very timid about trying to fix this, and posted on the Cafe. I got some guidance from "Sunburst", and realized that I was going to have to just dive in and do it. I removed some wood from one side, which made room for the neck to go to the correct angle, but it wouldn't stay there obviously. I glued in a shim and sanded it down so the neck would fit in the slot again, and the neck looked to be aligned perfectly. Next was checking the neck angle. A very simple way is the way Don MacRostie explains in the Stew-Mac videos. Just put a straight edge over the fretboard and frets, and set the bridge in place. It should meet the bridge approximately 7/64" from the top. This setting is according to Don's preferred action, so obviously there will be some trial and error involved with getting the action you want. Fortunately I was pretty close already and didn't have to adjust the neck angle.
I attempted to carve a nice design into the top of the headstock, but I quickly realized how tough a thing this is to do for a newbie with only a jeweler's saw and a flush cut saw. I ended up with a little bit of a mess, so I just cut it level and rounded the corners. A little disappointing, yes... but not the end of the world. I glued the lining in the sides to give the back a wider gluing surface, in preparation for gluing the back on. Most mandolins have a kerfed lining, this one just has a piece of wood the same width as the sides. The trick was getting the lining level with the sides.
After I glued the neck joint in, I was ready to attach the back. I test clamped it, and then glued and clamped it on. I used 15 assorted clamps in all, and while I could've used a few more, I think they did the job. After I removed the clamps the next day, I noticed that there are a few spots where the sides don't quite touch the back, I suspect because of some high spots in the lining. We're talking about a very miniscule gap here. I suspect that once I cut the back to shape and cut the binding channel, this gap won't even be noticeable. I'll know soon enough if this causes any structural problems.
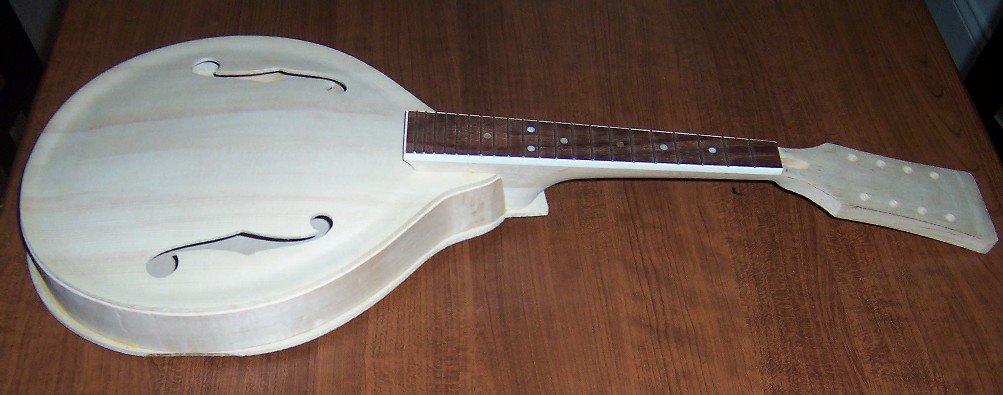
posted by Darren Kern at 8:01 AM
![]()


0 Comments:
Post a Comment
<< Home